
USB2000 SPECTROMETER
This is a long page with at least 25 images on it; dial-up users please allow for plenty of load time.
All your base are belong to us. 
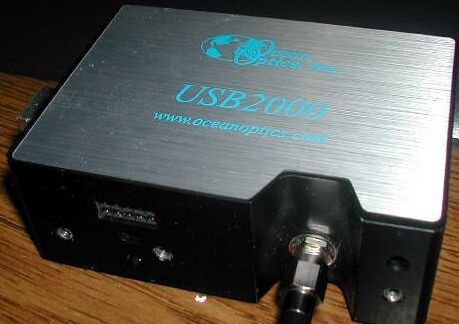
USB2000 Spectrometer, retail $3,205.00*
Manufactured by Ocean Optics (www.oceaninsight.com)
Last updated 05-08-24

* Pricing (in United States dollars) is accurate as of 10-17-09.
*** VERY, VERY IMPORTANT!!! ****
This product does not emit light of its own, so the standard review format will not be used and the product will be assigned a rating at once. A very high rating too, as during the time I've had it, it has thus far performed flawlessly. 


Also, you must note that a lot of the features of the spectrometer and its software suite go unused, and therefore, unmentioned.
The USB2000 Spectrometer is a very small device (fits in the palm of your hand!) that can provide the spectral content of any UVC, UVB, UVA, visible, or NIR light source (ranging from ~175nm to ~874nm) , using a program called SpectraSuite to show the spectrum on your computer screen in graph format.
It is very important that you install the software on your computer BEFORE plugging the spectrometer in; even more so with the USB version!!!
The USB version plugs directly into any free USB port on your computer.
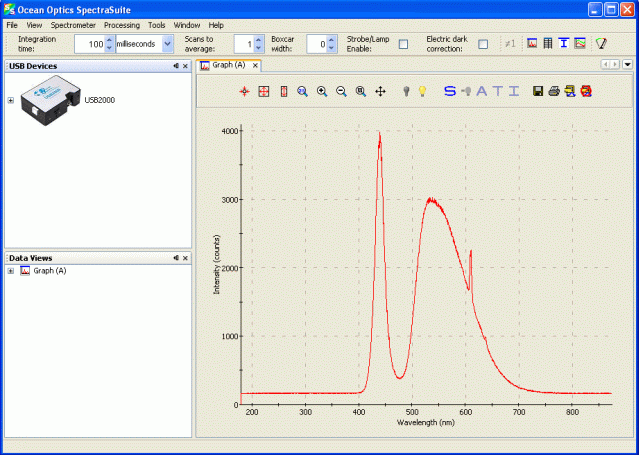
Here's a screen dump (yes it's really called that) of the SpectraSuite software window.
This program does a lot, but for this website sakes, I have just been taking screen dumps (yes, they're really called that), cropping them so only the spectral window is displayed, saving them in .GIF format (so that they're "web friendly"), and displaying them on this website; like this shining example:
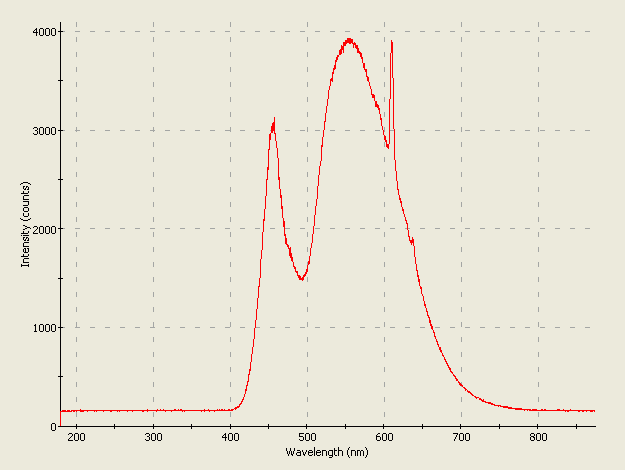
This is the spectrum from an Arc LS Prototype flashlight.
To use the spectrometer, run SpectraSuite first. Once that is running, turn off the lights in the test area until you see a flat red line on the spectral window in SpectraSuite, position the light source to be measured near the port on the side of the spectrometer's body (where you see an indentation in the spectrometer's case), and move it closer to or farther away from this port until the highest point of the spectrum on your computer screen reaches the "4000" level or below. If the light source is too close, the tops of the spectrum will reach the top of the spectral window in SpectraSuite and flatten out - this is your cue to back up the light source so that the light entering the port on the side of the USB2000's body becomes dimmer.
At this point, I just hit the "Print Screen" key on my computer, open a graphics program like IrFanView and then "paste" (CTRL-V)) my screen capture into it (depending on the image viewer software you choose to use, you may ***OR*** may not have to first load any convienient image into it beforehand and then "paste" the screen dump over it). I then crop it so only the spectral window is displayed, save it in .GIF format (so that it's "web friendly"), and display it on this website.
I'm certain there are other methods of data capture, but for my purposes, this is more than sufficient. Like I mentioned earlier, the SpectraSuite program is *FAR* more versatile, but this method works just perfectly for me.
TEST NOTES:
Test unit was loaned to me by TWO-CUBED.COM and was received on 03-06-06.

This picture shows you the relationship of visible light to UV and IR radiation.
Picture courtesy of a website fan and was used with permission.
UPDATE: 05-07-06
I have packed the USB2000 up so it can travel with me when I move to Sacramento around 05-22-06.
So I do not currently have it at my disposal for performing spectrographic analyses.
UPDATE: 07-06-06
The spectral chart is about as simple as it gets: wavelength starting at the left from ~175nm in the UVC portion of the spectrum to ~875nm in the near-infrared (NIR) region of the spectrum. The visible range is from ~380nm to ~780nm.
The higher the red line on the chart goes, the more radiation is being generated by the light source under test.
Let's take a look at one of these charts and see if I can tell you what's going on...
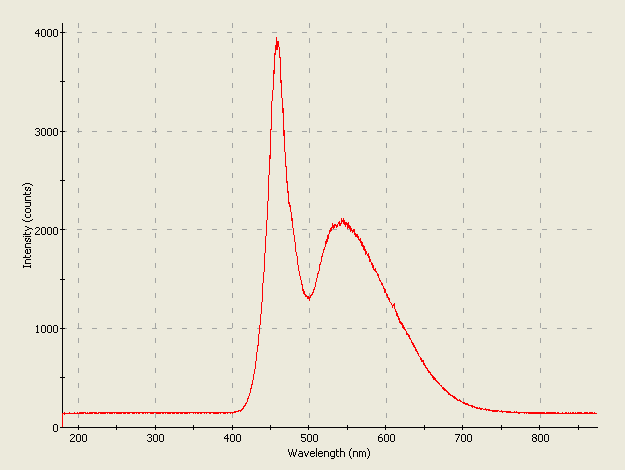
This is the spectrum from a typical Nichia NSPW500CS phosphor white LED, generally considered to be the brightest 5mm white LED as of early- to mid-2006.
As the chart shows, there is a strong peak in the blue at ~460nm, and a broad emission peaking at ~560nm in the yellow-green; overall, a cool white color is produced.
UPDATE: 02-01-07
The SpectraSuite software has been revised/updated; now the visible part of the spectrum can be colored, as shown in this example:
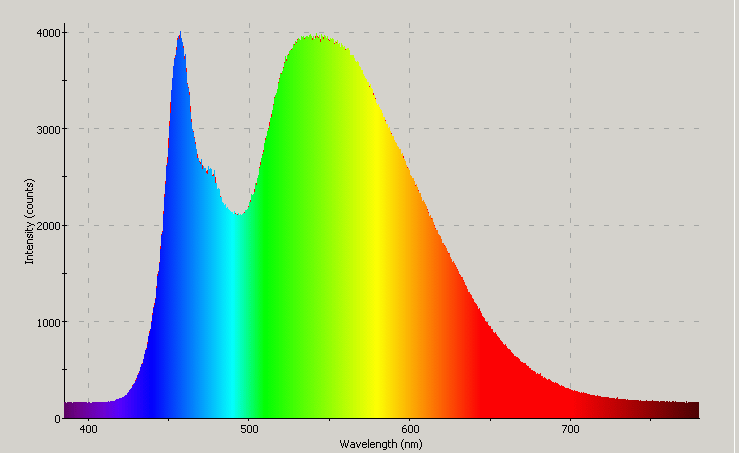
This is the spectrum of a Fenix P1D CE flashlight that uses a high-powered Cree white LED.
I used a function of SpectraSuite to limit the spectral display to the visible wavelength range (385nm to 780nm).
UPDATE: 09-18-07
The person who loaned me the instrument now needs it back, so I no longer have it at my disposal.
UPDATE: 09-18-07
No, you aren't seeing things.
Yes, a same-day update.
I have been informed that this spectrometer or another similar model will be loaned to me sometime in the future; so spectroscopy will not be forever gone from this website.
UPDATE: 03-08-08
I now have permanent custody of the USB2000 spectrometer, with much thanks & gratitude to P.L. of TWO-CUBED!!! 


UPDATE: 06-10-08
The optical cable appears to have failed, however I can still take spectra, and the optical cable from my PC2000-ISA spectrometer may very well fit - however since it is packed in an unknown box for a move to take place in a couple of weeks, I cannot verify this. But like I said, I can still take spectra; the only thing here is that I have to keep the instrument itself where I can directly irradiate it with the light source under test rather than keeping it tucked away and using the optical cable for this purpose.
UPDATE: 06-11-08
I found the PC200-ISA spectrometer's optical cable last night, and it does indeed fit and work with this spectrometer...so I'm back in business as they say.
UPDATE: 06-26-08
The baseline *CAN* be lowered through SpectraSuite; I had been doing this with Photoshop until now (primarily with lasers).
Here, let's let the following graph do the talking here:
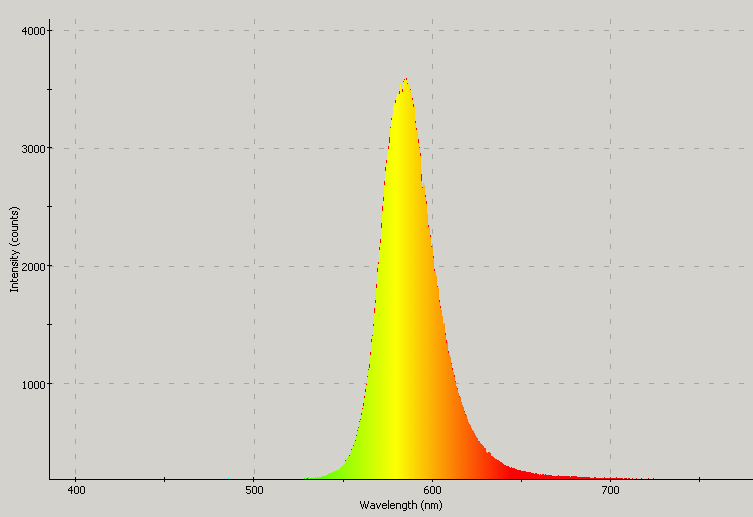
Note that there is no visible emission outside this yellow LED's native emission band.
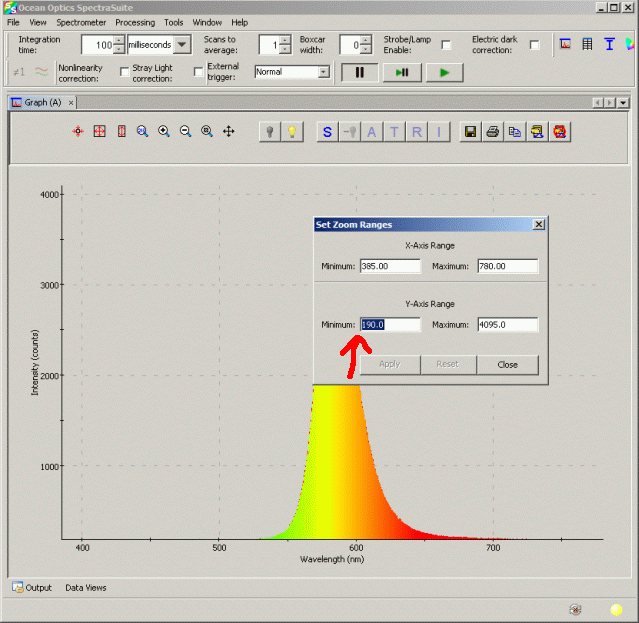
See that red arrow?
That's the field that needs to be changed here - to "190" in this case.
The specific parameter that needs to be set is the "Y-Axis Range".
UPDATE: 07-24-08
I have disconnected this instrument from the computer and screwed the metal "bung" over the light input aperture to help protect it from foreign matter. The next time this instrument will get used is sometime after 07-28-08 when I'm at my new location. I could be without internet access until as late as 09-01-08!!! Though this is highly unlikely, the probability is not mathematically zero.
UPDATE: 05-28-09
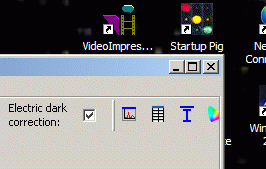
I have discovered a setting on the SpectraSuite window that's proven rather useful over the last several days...see where it reads "Electric dark correction" in the screen dump below?
I ticked (left-clicked my mouse pointer in) that box, and now the baseline sinks even more deeply. Instead of having to set it close to 200, I can now set it to 10 - this gives me greater range to play with, especially when dealing with weaker light sources.
The only "fly in the ointment" as it were is that the maximum vertical height of 4,096 is decreased by just under 200.
Here, let me demonstrate this with another screen dump; this time of the top of a white LED's spectrum:

See how the top portion appears "flattened" yet the spectrum isn't quite at the top of the scale? This though I *CAN* definitely live with...after all, this adjustment benefits weaker light sources, not stronger ones.

The USB2000 in quiescent mode; this "spectrum" shows only detector noise, which is very easily cancelled out.
As I just said, this is extremely easy to compensate for; it actually looks a whole lot worse than it actually is.
UPDATE: 03-06-10
I have fielded a number of questions about how to use this instrument over the last several months, so I think it's time to show you.
1: Fire up the spectrometer (of course) -- you do this by launching SpectraSuite.
2: You'll see a screen like the one below.

See the little "x" characters at the upper right of the "Data Sources" and "Data Views" boxes?
Click on them; the following screen shows what you should now see.
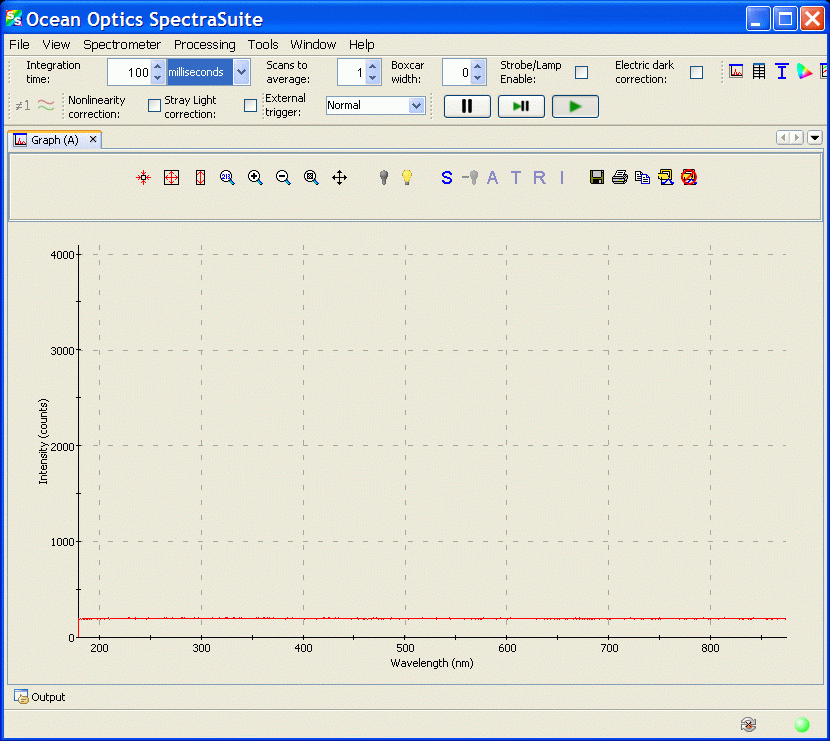
Where it reads "Graph (A)", look just below and to the right of it for a number of icons. Click on the fourth one from the left (the one that looks like a magnifying lens with the number "213" in blue lettering in it).
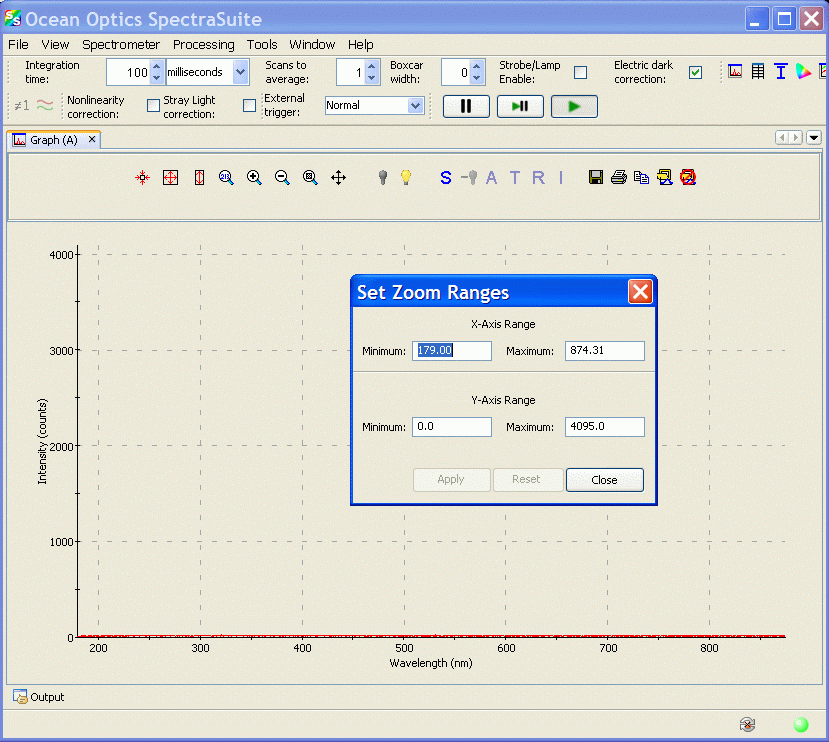
Type "380" in the first box (X-Axis Range) labelled "Minimum", type "780" in the box to its right labelled "Maximum", and type "21" in the box to the lower left under "Y-Axis Range" Leave the lower right one (that reads "4095") alone. Click "Apply", then "Close".
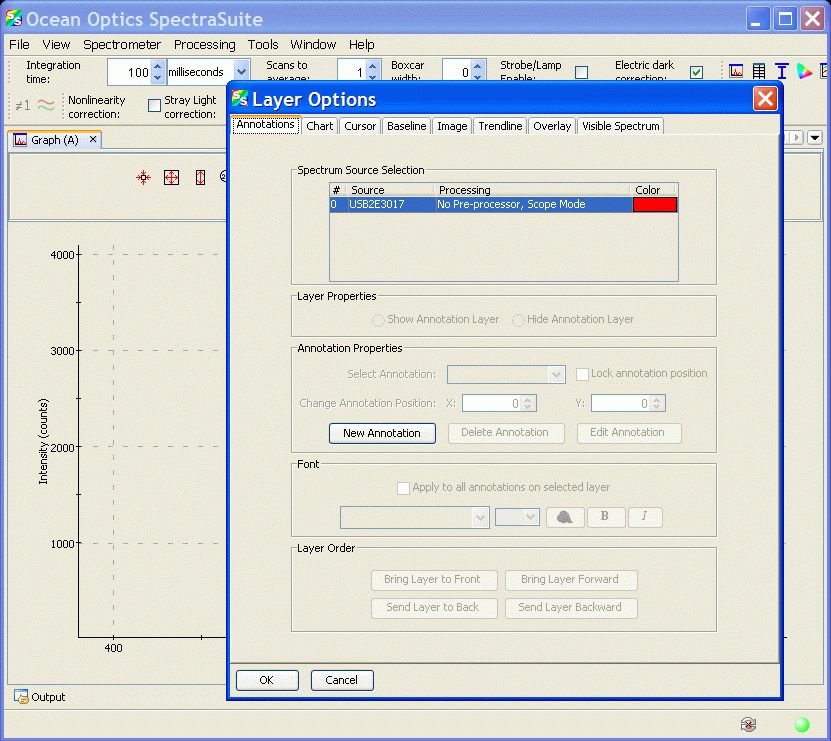
Place your cursor (mouse pointer) anywhere in the chart, and right-click on it. The box you see above should then pop up. Click on the "Visible Spectrum" tab, select "Show Visible Spectrum Layer", click the "Clip Visible Spectrum to Trendline" radio button, then click the "Send Layer to Back" button. Finally, click "OK".
Click on the "Electric Dark Correction" box near the upper right of the window; a green check mark should appear in it when you're successful.
It does not matter when in the setup process this box is checked; so long as you check it before you take your first spectrum.
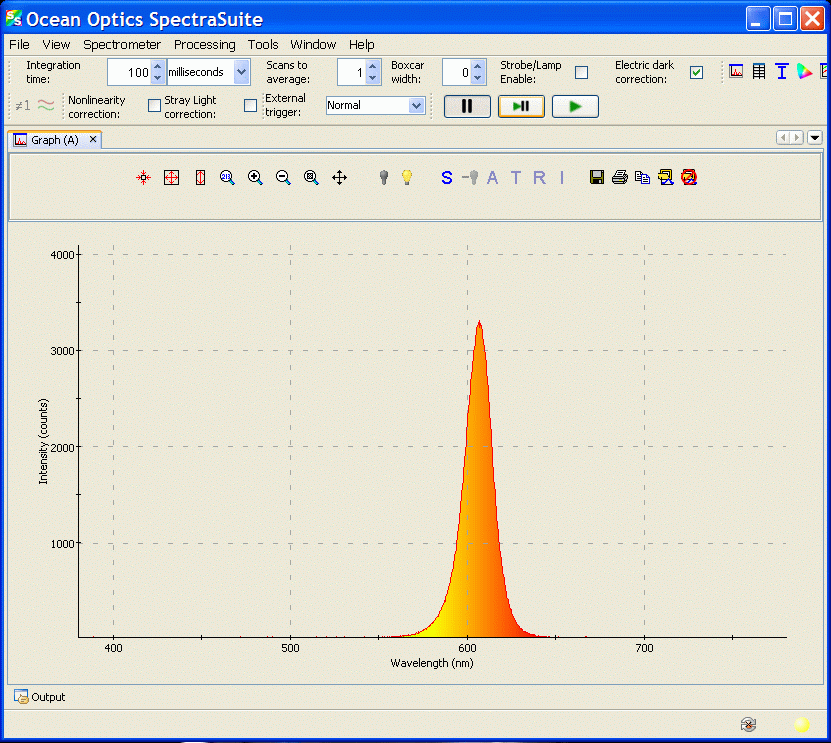
Finally, you may irradiate the spectrometer's sensor aperture with the LED under test. Move it slightly if the spectrum gets a flat top (indicative of excessive light) or does not go high enough (indicative of insufficient light). When the spectrum looks good to you, click on the button with the two thick black vertical lines in it.
What you do with this at this point is up to you; I simply press the key on my computer labelled "PrtScrn/Sys Req", open an image viewer, and press CTRL-V (paste). I then crop it so that only the spectrum itself is shown, and save it in .GIF format (this is a web-friendly format that does not cause distortions from .JPEG compression).
There appears to be no facility to "save settings" (well, not that I've yet been able to find anyway), so this setup procedure has to be performed every time you launch SpectraSuite.
UPDATE: 07-23-11
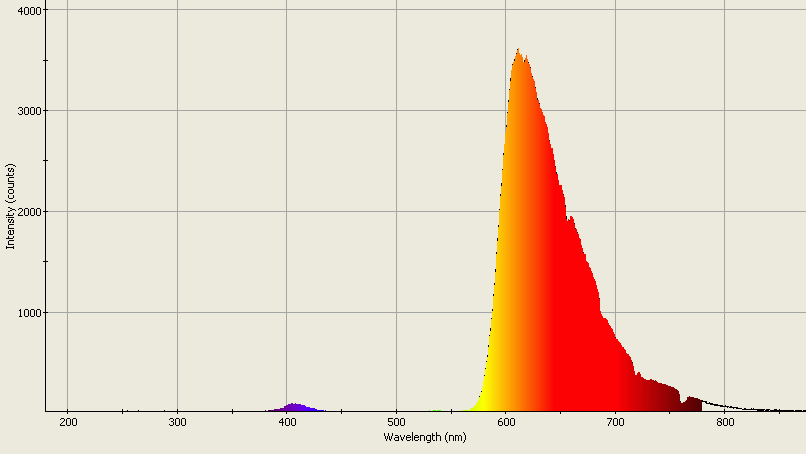
I performed spectroscopy of sunlight with the soft red plastic "bung" that fits on the sensor to protect it from things like dirt, mud, dust rabbits, monkey pee, horse puckey, etc. during storage or transport.
To wit:
UPDATE: 11-10-11
The SpectraSuite software by Ocean Optics has a couple of rather prominent web pages.
1: www.oceanoptics.com/Products/spectrasuite.asp
2: spectroscopytv.com/2008/07/17/the-basics-of-spectrasuite/
UPDATE: 11-16-11
The calibration report (data sheet) for this particular spectrometer is at this link if you're interested in viewing it. This is a .PDF file; you'll need to have Adobe Acrobat installed in order to view it.
I was furnished with it by N.D. from Ocean Optics on 11-15-11 after asking for it late on the evening of 11-14-11 by request of a website viewer who required spectroscopy of his Zilla "Reptile" Fluorescent Bulb. I really do appreciate the promptness of N.D. from Ocean Optics in getting this to me!!!  Thank you ever so much!!!
UPDATE: 02-06-16
The final release of SpectraSuite software is WAS at http://oceanoptics.com/support/software-downloads/ (approx. 80% down the web page). I've been using it for the last several months, and it has thus far performed flawlessly.
For the last few years, I've also been capturing spectral data files (in .TXT format that can be imported directly into Microsoft Excel or other spreadsheet software) that many of this website's visitors have requested.
UPDATE: 09-26-18
I have obtained the wavelength calibration data sheet; it's available right here.
It is equipped with Grating #2 (600 lines/mm), it has a 25µ slit, and its optical resolution (FWHM) is ~1.42nm.
I really do appreciate the promptness of N.D. from Ocean Optics in getting this data me (YES, A SECOND KUDOS TO NORM!) 
Thank you ever so much!!! 
UPDATE: 02-22-20
Ocean Optics has apparently gone tits-up, so the always-dreadful, " " icon will be appended to its listings on this website at once and all of the links pointing to the Ocean Optics website will be removed.
I have managed to salvage the SpectraSuite programs and have them stored on my own server if you have a USB2000 spectrometer and need them.
SpectraSuite for Windows 32-bit (file size 63,230,568 bytes)
SpectraSuite for Windows 64-bit (file size 70,263,664 bytes)
UPDATE: 03-30-20
Ocean Optics has not in fact gone to pot; they simply have a new website.
www.oceaninsight.com
UPDATE: 05-08-24
I no longer have the USB2000 or anything else for that matter; I fell prey to a crippling stroke on 03-21-22 and a paranoid relative destroyed all of my worldly posessions on 05-15-22.

MANUFACTURER: Ocean Optics
PRODUCT TYPE: Spectrometer
LAMP TYPE: N/A
No. OF LAMPS: N/A
BEAM TYPE: N/A
SWITCH TYPE: N/A
CASE MATERIAL: Aluminum
BEZEL: N/A
BATTERY: N/A
CURRENT CONSUMPTION: Unknown/unable to measure
WATER RESISTANT: No
SUBMERSIBLE: NO WAY HOZAY!!! 
ACCESSORIES: Software CDs, connecting cable
SIZE: 90mm W x 63.5mm H x 35mm T (incl. feet)
WEIGHT: 220.20g (7.77 oz.)
COUNTRY OF MANUFACTURE: USA
WARRANTY: Unknown/not stated
PRODUCT RATING:


USB2000 Spectrometer * http://www.oceanoptics.com/products/usb2000+precon.asp
Do you manufacture or sell an LED flashlight, task light, utility light, or module of some kind?
Want to see it tested by a real person, under real working conditions? Do you then want to see how your light did? If you have a sample available for this type of
real-world, real-time testing, please contact me at bdf1111@yahoo.com.
Please visit this web page for contact information.
Unsolicited flashlights, LEDs, and other products appearing in the mail are welcome, and it will automatically be assumed that you sent it in order to have it tested and evaluated for this site.
Be sure to include contact info or your company website's URL so visitors here will know where to purchase your product.
This page is a frame from a website.
If you arrived on this page through an outside link,you can get the "full meal deal" by clicking here.


 Thank you ever so much!!!


