The butts of this website are my Rascal™ Scooters™ & EMC™ Model 255™ Powerchair™.
They are far from "stock" or "factory", instead, they has been customized greatly. The way I see it, if I have to be in the silly things
at least I'm going to have some fun with them. :)
As seen on KOMO 4 ABC, KING 5 NBC, KIRO 7 CBS, KCPQ 13 FOX, and FSN Fox Sports Net.
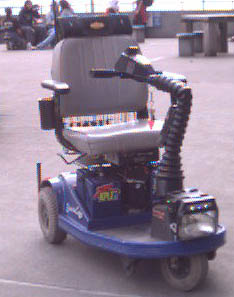
THIS IS MY ORIGINAL MODEL 205 SCOOTER
This is the first scooter I modified - though I did add a whole bunch of electrical flashy blinky things to an old Everest & Jennings hospital wheelchair long before I got my first scooter.
These are the modifications I did to my very first scooter:
Added...
5-channel, 180-watt AM/FM cassette stereo with subwoofer.
Nitride-based BLUE LED taillamps. Contains 12 high intensity blue LED emitters across the rear bumper.
Power management system with backlit screen.
White nitride (cool-burning LED) backlighting installed into OEM power meter.
Blue-violet LED main power indicator. (Scooter got accidentally left on a lot before installing this).
Radio operated automatic door unlocker.
70-watt quartz-iodine rectangular headlamp; has both high and low beams.
Nitride-based "emerald green" LEDs across sides for daytime/twilight visibility.
Nitride-based white and blue LEDs in front as a daylight running light.
Pylon-mounted receptacle for a cell phone.
New high-intensity Hewlett-Packard red LEDs embedded in rear reflector lenses.
High-intensity red cluster LED modules installed on seat pylons and on rear frame.
12-volt, 17aH battery installed specifically to operate *all* third-party equipment.
My scooter's blue LED taillights, seen here operating at 19% power when photographed in their own light; no photoflash was used.
Repairs I've done to this scooter:
Replaced rotor cap, bushings, motor brushes, and rebuilt electromagnetic parking brake.
(This saved me from having to cough up $799.00 for a new heavy-duty transaxle).
Replaced three tires & transaxle mounting clamps destroyed by a local construction company's unattended chemicals.
Replaced the propulsion controller assembly.
Added two multiple LED potted modules (20 LEDs each) just inside each rear tire, and added two 5-LED modules under the seat's armrests to enhance nighttime and poor weather visibility.
Replaced *another* popped innertube.
Added a custom "boot" to the steering column to enhance scooter's appearance.
Replaced both armrests.
Replaced both main batteries.
Replaced large speakers with tiny Bose acoustimass modules, located behind each armrest.
Added custom LED illumination to an ad for one of my websites on the seatback.
Moved the speakers to the top of the seatback; they kept getting jammed in narrow doorways. :)
Replaced an innertube in a tire that popped; three new tires are needed soon.
Custom-built a special receptacle on the scooter's boot assembly (later moved to a seat pylon) for a cellphone.
Added new HP high-intensity red LEDs to the fenders; installed transmissive reflector lenses over them. The original non-transmissive (opaque) reflectors were remounted high on the seatback.
Added a pair of high-intensity red cluster LED modules to the left & right seat pylons.
Replaced another set of motor clamp receivers - the fourth set to date.
Replaced both rear tires - again.
Another view of the "offending" article. (no, it isn't offending at all!) :-)
PLEASE, do not attempt any of these modifications on your own scooter unless you know what the hell you're doing. They were performed
by somebody with electronics knowledge, and only after the warranty period had expired. I would never recommend hacking a scooter that still has a warranty
running on it, or else if you blow something up, the warranty will probably no longer cover it due to "unauthorised user alterations" or some such horse puckey.
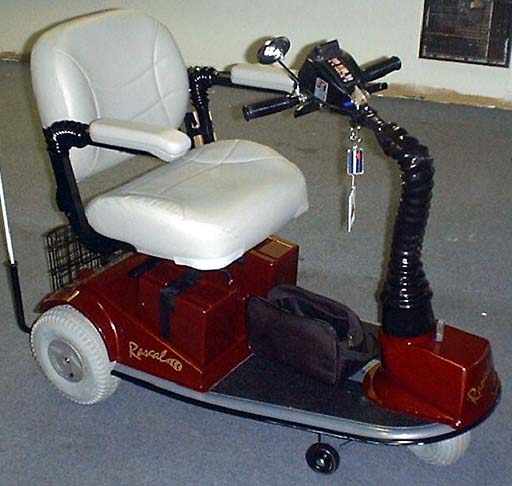
After a long wait, this beauty showed up on my doorstep on November 7th 2000.
This is the 2000 Rascal Model 245 Heavy Duty long frame scooter.
My old scooter kept breaking in large part because it was the "economy" model and couldn't really take the hilly terrain
and crappy sidewalk maintenance in my city. That's why it kept frying gearboxes and breaking motor mounts.
This scooter is designed for this type of use, and as such it should last a lot longer.
Some other differences between my new scooter and my old (now my backup) scooter:
All-metal frame which carries a lifetime guarantee.
Much more stable seat locking & mounting system. Seat swivels & can lock at 45° intervals.
Adjustable, flip-up armrests, adjustable back angle, form-fitting seat cussions.
Convertable frame not only disassembles into smaller components, the scooter can be converted into a big 4-wheeler, two sizes of 3-wheelers, and motorized wheelchair
just by slipping on a new front section.
Heavy-duty "whisper quiet" drivetrain. The thing is barely audible, where my old one was noisy and clunky right from the get-go.
Tires are larger, and filled with this crap to help prevent punctures.
Has front and rear baskets. Front is removable, rear is foldable and removable.
Range per charge is increased to 25 miles.
Motor controller is 70 amps (not 55) and has a high pedal disable safety circuit.
Anti-tip wheels are mounted on springs instead of being screwed directly to the frame.
And now the part you've all been waiting for: the list of repairs & modifications
Added two high-intensity potted LED modules for brake lights. Installation without drilling holes or cutting/soldering wires preserves unit's warranty.
Added a bar containing blue, aqua, and green LEDs in between the two taillight modules, powered by the same circuitry. Dimmed the taillight modules so that current could be diverted into the new
lightbar without increasing the overall power draw. In fact, it uses less now than it did before.
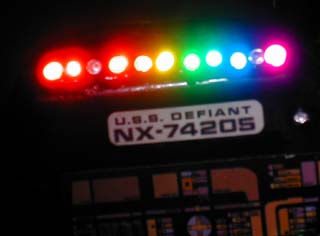
The world's first "transspectral array" composed entirely of LEDs.
I had to wait until the violet LED became available before I could do this.
The LEDs are connected to a pseudo-random flasher, so not all are on in this picture.
Since this device covers much of the visible spectrum, it can be said
that this is also the world's first "gay pride light" composed entirely of LEDs.
Here's a more recent picture after I added a second bank
of LEDs to fill in the gaps in the spectrum. Time exposure.
Update 11-28-04:
Some number of months (possibly as early as September 2002) ago, I added a strip of "spider" (high flux) LEDs in red, orange, yellow, green, blue-green, and blue to the back of the scooter. The strip is identical to the one found right here, and was built by the same person.
Installed the tiller assembly from my old scooter. This longer tiller is more comfortable, plus it already has the battery meter backlighting and power-on light.
This component is electrically identical, so again, no problems are anticipated. It was recently equipped with a brand spanking new engager pot assembly (the major wear component), so it behaves as if it really were new.
20 deep vibrant blue LEDs added to the back fender in the form of a "light bar". These LEDs are different from the ones I put on my old 205, in
that they appear a deep, piercing blue-violet; especially noticeable under subdued lighting but visible anytime day or night.
Installed a sequencing module of 80 bright red LEDs to the undercarriage to function as "ground effects" lights.
Installed a sequencing module of 10 red and 10 blue LEDs to the footrest support to function as more "ground effects" lights.
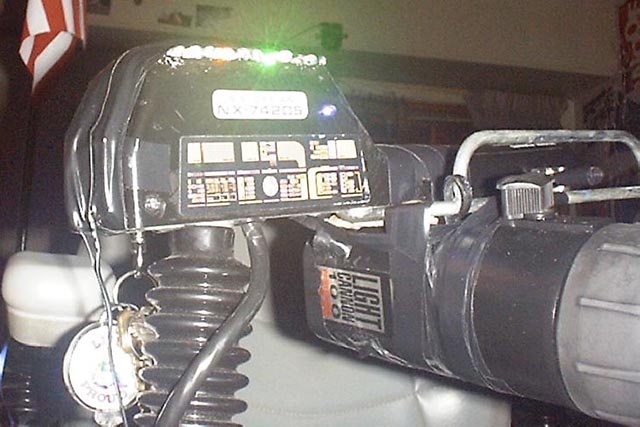
Installed a 10W HID (High Intensity Discharge) headlamp to the steering arm.
Installed a row of 6 pure violet LEDs to the rear cowling just behind & under the seat.
Installed the transspectral lighting array to the steering arm as shown in the above photo. This has LEDs of 6 common colors: red, orange, yellow, green, blue, and violet.
I later added near-IR, neon bulb orange, yellow-green, blue-green, and royal blue to complete the visible spectrum.
This is a snapshot of my *old* blue lightbar & red taillights.
Now that the warranty has expired, I have added white LED backlighting to the battery meters on both tillers, and have added a power-on LED to them as well.
I also tied the red LED brake light modules into the motor controller's high pedal circuit, so they come on when I'm moving, and go off when I'm stopped.
I also pulled a resistor out of the speed controller to get an extra couple of MPH out of it. :o
IMPORTANT!!
If you decide to modify your own scooter, be aware that if you cut into the wiring, you may obliterate the scooter's immunity
to RF radiation (thus, making it no longer FDA approved) and ruin your warranty as well.
I used a completely isolated battery to power such things as lights and radios; nothing was connected to the scooter's own wiring.
Plus, my 20 volts per meter RF immunity remains intact. The FDA doesn't like people screwing with things that could affect this rating because of safety reasons.
You don't want your Rascal to suddenly take off on its own when someone standing nearby picks up a phone, or when a fire engine goes by, or possibly even when someone next door flushes a toliet.
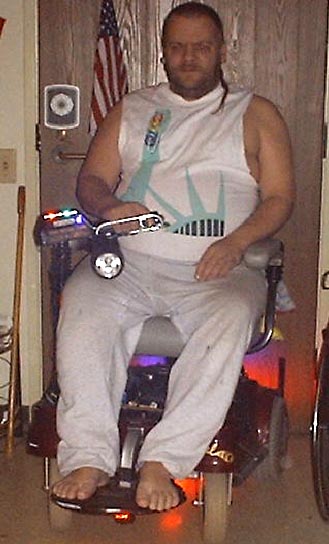
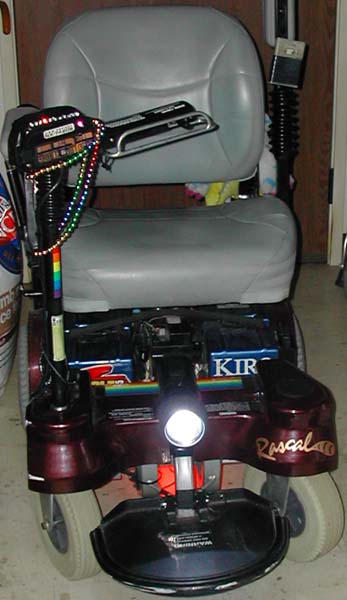
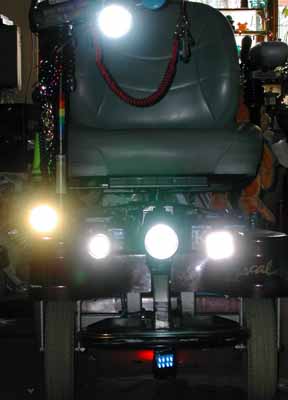
This is my EMC model 255 scooter/wheelchair conversion.
Now comes the fun part. With no more warranty fo f*ck up, I can hack up this chair all I want.
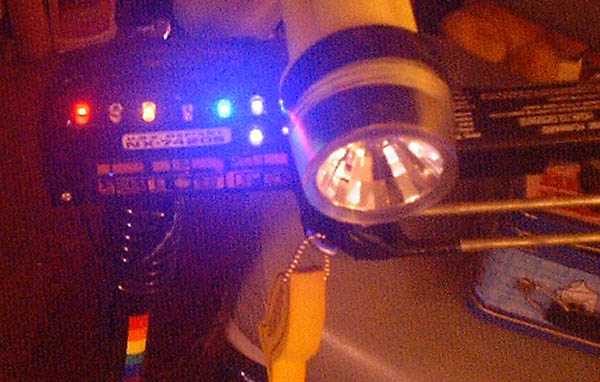
Let's start with that transpectral array on the tiller arm. It has been expanded to include 2 seperate pseudo-random controllers with 10 data lines,
controlling 11 LEDs each of a different color. The color progression now goes like:
Deep red, HeNe laser red, orange, orange-amber, yellow, yellow-green, emerald green, blue green, light blue, pure blue, and violet.
Close up of the steering tiller showing the LED array and my new HID headlight.
Eventually, I'll drill out the housing and mount the LEDs, eliminating all the tape.
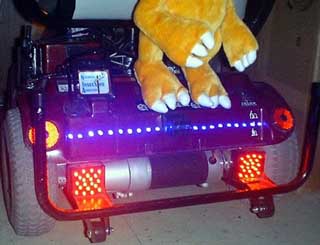
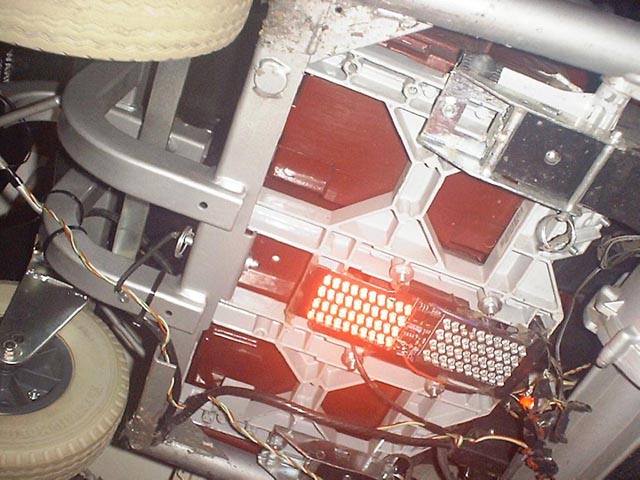
One of the first things I put in this chair is a PIC-controlled LED display board with 80 super bright red LEDs that flash in a preprogrammed sequence. This lights up the ground
underneath the chair so bright it can be noticed in broad daylight. At night, it looks like my warp reactor is about to pop. :-)
This display board, along with most of the other LEDs on my chair, is powered by a seperate 12V 17aH gel cell battery mounted under the seat in between the two
larger chair batteries.
Ground effects PCB with 80 brilliant red LEDs.
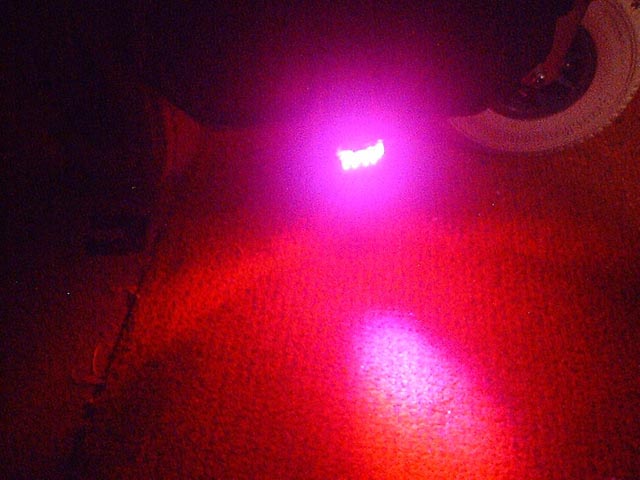
This is another PIC-controlled LED flasher board. It has 10 blue LEDs and 10 red ones that flash in an alternating, preprogrammed sequence.
The small board is mounted to the support post for my footrest, and aimed at the ground just in front of and under the footrest.
Front ground effects under my footrest.
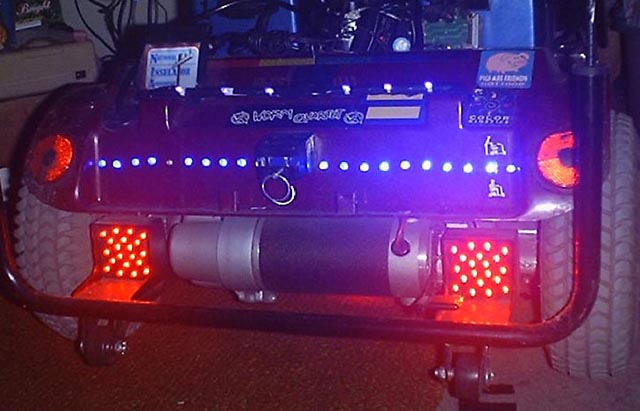
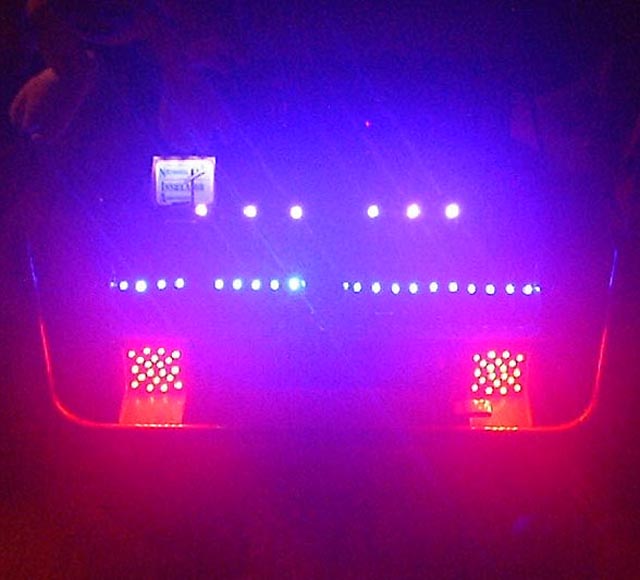
This picture shows the back of my chair. The white lighted panel in the upper left is my National Insulator Association membership decal, lit by 4 white LEDs in a plastic panel.
Directly under them is a row of six VIOLET LEDs. They are so new, they've only been out since November 2001.
Below them is a row of 20 super bright, deep blue LEDs. Notice one of them is out - it was damaged and I simply bridged it because it can't be replaced without the new one
breaking too.
Finally, below those you'll see my two red taillight modules. They're connected to the motor controller's high pedal disable circuitry, so they come on when the chair is moving, and go
out when I'm stopped.
You may be able to see a red glow on the carpet under the motor - this is from the big ground effects array mounted on the undercarriage.
Whole mess of exotic LEDs in the back.
This is another view of the chair from behind. Damn, that's bright. :-)
It's actually *much* brighter - I had to stand off-axis or all you'd see is a huge blue & pink blob!
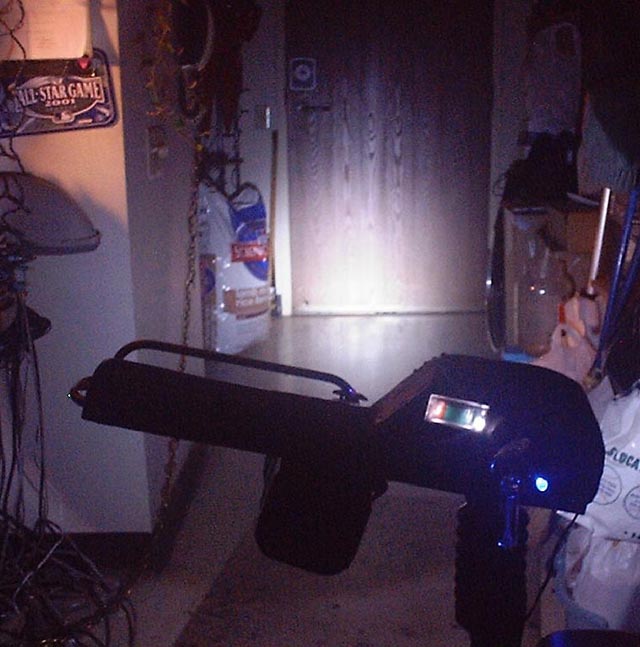
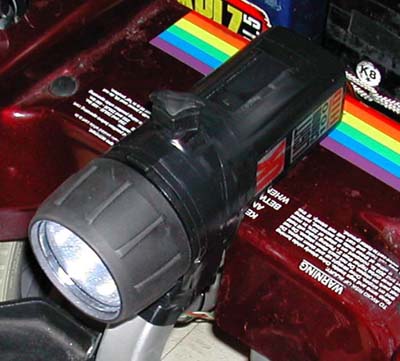
The photograph below is of the HID (High Intensity Discharge) headlight being used. It is mounted to my steering tiller as you can see, and it really blows other lighting options
clean out of the water. You'd have to go to a 55 watt halogen to get a better light, but this one only uses 1.25 amps at 12 volts!!
This is the exact same type of light being used as headlamps in newer Mercedes and BMW cars. You can tell HID apart from regular bulbs because HID lights will have a distinct,
piercing bluish-white color. This is the first known occurance of a miniature metal halide lamp being used as a headlight in a powerchair.
(boy I'm just full of suprises today, aren't I?)
My HID headlight burning a hole in a door. :)
Picture was underexposed by 2 stops so it wouldn't turn into a big white blob.
Well, that's about all the pictures I have for today.
Most of the LEDs have been shown, except the two white LEDs I used to backlight my power meter, and the blue-white "power on" light I put in just to the right of the keyswitch.
(Well, you can kind of see them in the headlight picture).
So that's 100 LEDs under the chair, 15 in the tiller handle, and 46 in the back. Plus a Welch-Allyn 10W HID bulb used as a headlight.
That's a lotta light. :)
Newer pictures showing the HID light in action. This mounting location places it out of the way and removes the weight from the steering arm.
They always told me to use the power between my legs. Since I ain't getting any...ummm... action there, I figured I'd just do it literally. Though this
is quite a bit lower than that "other" part. :-)
The other lights in the last shot are a 40-LED and 60-LED flashlight, a Luxeon Star powered light, and a 15W quartz iodine MR-type bike light.
IF YOU BUY A RASCAL, PLEASE MENTION YOU HEARD ABOUT IT FROM ME (CRAIG JOHNS0N) THANK YOU! :)
How to make your Rascal go from filthy to factory fresh in 5 minutes
Need to clean that filthy thing for a date and you only have a few minutes?
Then give this a try...
Clean it as usual with Windex and paper towels. Right now you just want the dirt off so you don't rub it in with the next step.
Mist the plastic, visible metal framework, and floorboard with WD-40. Do not spray the seat.
Wipe thoroughly with paper towels or lint-free rag (an old cotton T-shirt works well).
The plastic will shine like never before, and even the normally grey and dirty floorboard will be black and new-looking again.
If you have time, you can also WD-40 the rubber tiller boot and work it in with your rag. This does take a bit more patience but it does work.
WD-40 will also remove some types of "road grime" that Windex won't touch, and also helps to make adhesive residue (such as from tape or stickers) easier to remove.
Please visit the Wheel Chair website when you have a moment.
For information on LEDs, visit my other website, The LED (and Laser) Museum and learn about these colorful lights.
IF YOU CAN BENEFIT FROM A RASCAL, VISIT THEIR WEBSITE AT WWW.RASCALSCOOTERS.COM
OR CALL 1-800-662-4548 (1-800-MOBILITY) FOR A FREE, IN-HOME TEST DRIVE.

 The butts of this website are my Rascal™ Scooters™ & EMC™ Model 255™ Powerchair™.
 Repairs I've done to this scooter:
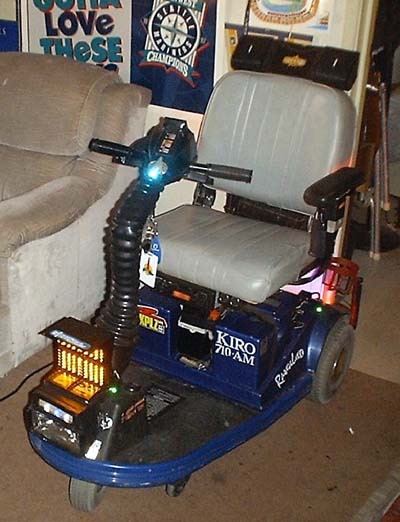
 After a long wait, this beauty showed up on my doorstep on November 7th 2000.