CESSNA R/C AIRPLANE


Cessna R/C Airplane, retail $89.95
Manufactured by (Unknown)
Last updated 08-11-08


This isn't a flashlight, household lamp, Christmas light set, or other thing that glows,but what the hey. I have only evaluated remote controlled (RC) toys several times before, so please bear with me here.

I love things that fly; that's why I took the bate and also why I added a seperate section titled "PRODUCTS DESIGNED TO FLY" on my website.

This is a rather large (38.5" wingspan), easy-to-fly remote controlled airplane. It is designed *EXCLUSIVELY* to be flown outdoors - primarily because of its size & speed.


 SIZE


This toy is (should be) remarkably easy to use for an R/C airplane...here's how to make it fly:

Assemble it first (assembly is a rather complex process; please refer to the furnished instructional materials for this procedure).
As with any rechargeable product, charge it first (see directly below), and then you can pretend to fly a dragonfly (well, that's what the kitty cat would think it is if it were designed to be flown indoors - fly it outdoors in a fairly large space relatively free of obstructions like trees or utility poles - a public park is a good place to start here.


Pull up on the antenna on the remote control to extend it.

1: On the remote control, slide the switch near the lower right of the front surface toward the front of the remote (toward the antenna); a green LED will come on. Extend the antenna if you have not already done so. Be absolutely, positively, 100% certain that the left-hand control stick is pushed all the way up, or you might very well be sorry (and reaching for the Band-Aids™, reaching for a replacement propeller, etc.) sometime within the next several seconds.

2: Be certain the battery in the airplane is fully charged first; install the battery in the airplane at this point.

3: On the left hand side of the airplane's body in the front side cockpit "window", there's a pushbutton on/off switch.
    Press & release this button to "arm" the propeller. This is where you'll be glad that the left control stick is up.

4: Place the airplane on a hard surface such as a sidewalk, unused street, or reasonably well-groomed baseball park infield. Orient the airplane so that it faces away from you.

6: Pull the left hand stick on the controller back toward you (down); the airplane's motor (propeller) should now rapidly throttle up. Pull down on the right hand stick to raise the elevator flaps.

7: Direct the antenna on the remote control as vertically as you can. The airplane should rapidly accelerate along the "tarmac" and soon lift off.

Congratulations, you are now a pilot!!!
I would say that about mine - if it worked that is.

For additional instructions & tips on how to fly, please read the instructional material that comes with the product.

Turn the Cessna and remote control off when finished using them.
Same switches as before, but slide the one on the remote control in the opposite direction and press & release the button on the airplane itself.
***IMPORTANT!!!*** Remove the battery from the airplane at this point.


The battery in the airplane itself is rechargeable and is not designed to be changed (it does need to be removed for charging, and it can indeed be changed if it poops out - but I'll get to that a bit later); however the batteries in the remote will need to be changed from time to time.

To do this, slide the battery door off & remove it, very gently place it on the ground, and kick it into the garden so the hungry, hungry praying mantids will think it's something yummy for their insect tummies and subsequently strike at it...O WAIT!!! YOU'LL NEED THAT!!! So just set it aside instead.

Remove the eight used AA cells from the compartment, and dispose of or recycle them as you see fit.

Insert eight new AA cells into the compartment, orienting each cell so its flat-end (-) negative faces a spring for it in each chamber.

Finally, place the battery door back on.
Aren't you glad you didn't kick that battery door into the garden with all those hungry, hungry praying mantids now?


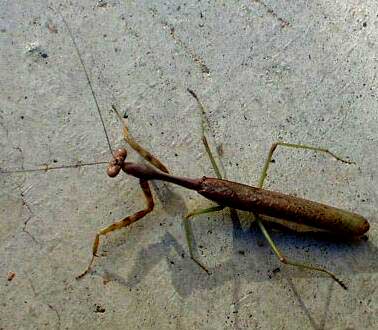
Here is what a praying mantis looks like.
I found this guy on the morning of 09-08-06 clinging to the basket of my scooter.


To charge the battery in the airplane, follow these steps (it's quite simple, actually!):


1: On the bottom of the airplane's fuselage (body), you'll see a vented battery door held in place with two clips. Rotate the clips approximately 100°, lift the front edge of the battery door, remove the battery door, and set it aside.

2: Remove the battery pack from the compartment, and unplug it.

3: Plug the plug on the end of the charger's cord into the plug on the end of the battery's cable, and plug the large part of the charger into a standard (in north America anyway) 110 volts to 130 volts AC 60Hz household receptacle.

4: Charge time is not stated; I figure when the battery pack becomes very warm to the touch (~125°F (~51.7°C)), it should be charged sufficiently close to completely to call it "charged".

5: Reverse the above steps; and there, you're done - though only install the battery pack back in the airplane if you plan to fly it within the next several minutes or so; otherwise leave the battery pack out and replace the airplane's battery door with the compartment empty.
See, told ya that it would be easy.


This RC airplane is meant to be used as a toy in a dry area outdoors, not as a flashlight meant to be carried around, thrashed, trashed, and abused, so I won't try to drown it in the toliet tank, bash it against a steel rod or against the concrete floor of a patio, let my housemate's citty kats go to the litterbox on it, run over it with a 450lb Celebrity motorised wheelchair, stomp on it, use a medium ball peen hammer in order to bash it open to check it for candiosity, fire it from the cannoñata, drop it down the top of Mt. Erupto (I guess I've been watching the TV program "Viva Piñata" too much again - candiosity is usually checked with a laser-type device on a platform with a large readout (located at Piñata Central), with a handheld wand that Langston Lickatoad uses, or with a pack-of-cards-sized device that Fergy Fudgehog uses; the cannoñata (also located at Piñata Central) is only used to shoot piñatas to piñata parties away from picturesque Piñata Island, and Mt. Erupto is an active volcano on Piñata Island), send it to the Daystrom Institute for additional analysis, or perform other indecencies on it that a flashlight might have to have performed on it. So this section of the web page will be ***SIGNIFICANTLY*** more bare than this section of the web page on a page about a flashlight.

The maximum range of the remote control to the Cessna R/C Airplane is an amazing ~985 feet (300 meters).
The remote control uses radio waves; not infrared radiation like R/C aircraft designed specifically to be flown indoors.
The transmitter in this particular model operates at a frequency of 27.145MHz. I believe that there is at least one, possibly two additional frequencies available, so that more than one Cessna can be flown in the same airspace simultaneously.

The body of the Cessna is made of a very lightweight foam (known by most people as Styrofoam®), so it can withstand crashes that a heavier aircraft might be damaged or even destroyed in.

This product is recommended for users of 14 years of age or older; younger children can injure themselves on moving parts or by swallowing something they should not (like an AA cell or one of the spare propellers).

The airplane's motor will continue to operate for a second or two after contact is lost with the remote control - but it *WILL* stop after this time has elapsed.

There is a long, thin black wire coming from the back of the airplane;
***DO NOT*** pull, cut, or otherwise remove it!!!
This is the airplane's antenna, and it is absolutely necessary for the wire to be intact for the airplane to maintain contact with the remote control!!!

If the wings on the Cessna airplane become damaged (such as if you graze a tree or something), repairs may rather easily be performed with nothing more than a bit of transparent household tape.

There are a number of small parts & screws still loose after assembly; there is no indication at all as to where they're supposed to go. There's nothing electrical among these loose parts; so that should not be why there is no response from the aerilons, elevator flaps, rudder, or propeller. There's no relation between these loose parts and the electrical functionality here.


Photograph of its remote control.


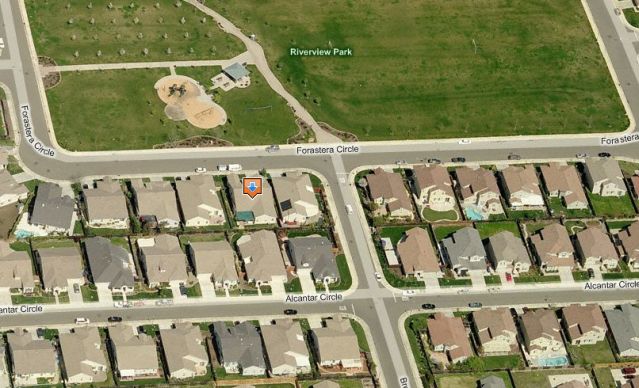
Aerial view of Riverview Park, where I'll make all flights of this airplane.


And here are two photographs of the park I will make all flights in.
The first one is the paved area I can take off from.
The second shows the wide open, treeless space I can fly in after liftoff.


WMP movie (.avi extension) showing the product "trying" to fly.
This clip is approximately 2.38 megabytes (2,457,128 bytes) in length; dial-up users please be aware.
It will take no less than twelve minutes to load at 48.0Kbps.
I cannot provide it in other formats, so please do not ask.

In this clip, you can hear me say "Flight number five", in the same manner as the speech synthesizer in the coin-op arcade video game ''Looping'', then you can hear the motor fire up.

The flight attempt in this clip was made on 08-10-08 at ~10:10am PDT.
I made four additional flight attempts immediately prior to this one, but could not get the aircraft to lift off.
In the clip shown above, I threw the airplane instead of trying to get it to lift off on its own.

It's acting as though the main motor (driving the propeller) just doesn't
have the {vulgar term for testicles} to allow the plane to lift off or fly.


Screen dump from the above video clip.


TEST NOTES:
Test unit was ordered via an Ebay listing on the afternoon of 07-01-08, and was received at 10:47am PDT on 07-07-08

Product was DOA so I'm going to make a new icon for this website specifically for this reason.
That icon will be "" indicating that the product was DOA.

Product was made in China.
A product's country of origin really does matter to some people, which is why I published it on this web page.


UPDATE: 07-11-08
This airplane isn't dead anymore!!!
A plug was found loose inside the fuselage (body) that belonged plugged into the receiver box; once it was plugged in where it belonged, the airplane sprung to life - promptly shooting off the bed and onto the floor, necessitating the replacement of its propeller with one of the included spares.

This airplane may be too large to take to the park in my electric wheelchair (it's approximately 25 minutes from here one way), so I may indeed have to wait until after 08-01-08 before I can take it on its maiden voyage at my new location - the new place is *MUCH* closer to a park.


UPDATE: 07-31-08
I'm going to attempt a flight at a very nearby (literally across the street from here!) park later this morning.
I'm temporarily on a dial-up connection, so I may wait until broadband is in place before uploading the resulting movie clip of the flight; but I tested the takeoff area with another aircraft known to lift off and fly, and was successful there.


UPDATE: 07-31-08
No, you aren't seeing things.
Yes, a same-day update.
Looks like it *MAY* be a bit too windy to fly today, but we'll see how conditions are as the day progresses.


UPDATE: 08-06-08
There is an AC charger port on the remote; this tells me that it's kosher to use rechargeable cells in it.
The total system voltage is 12 volts with alkalines (8 cells) - therefore a charger that outputs 12 volts DC is probably what you want.
Polarity is not shown, but it's very likely the standard "center positive outer barrel negative".


UPDATE: 08-09-08
I was going to fly yesterday morning, but it was just way too windy.


UPDATE: 08-10-08
Same as yesterday (08-09-08)...I was going to fly yesterday morning, but it was just way too windy.


UPDATE: 08-11-08
I made a movie clip of one of five unsuccessful flight attempts I made yesterday at midmorning.
I would take a photograph of this airplane in a toliet, but it is way too large to even fit the area the commode is installed in without requiring significant disassembly.


PROS:


CONS:


    MANUFACTURER: Unknown
    PRODUCT TYPE: Large R/C airplane
    LAMP TYPE: N/A
    No. OF LAMPS: 0
    BEAM TYPE: N/A
    SWITCH TYPE: Pushbutton on/off on side of product
    CASE MATERIAL: Styrofoam & plastic
    BEZEL: N/A
    BATTERY: 8xAA cells (remote), 9.6 volt 650mAh NiMH rechargeable (airplane itself)
    CURRENT CONSUMPTION: Unknown/unable to measure
    WATER- AND PEE-RESISTANT: Very light splatter-resistance at maximum
    SUBMERSIBLE: NO WAY HOZAY!!!
    ACCESSORIES: 3 spare propellers, 4 spare rubber bands (for wings),1 screwdriver, AC battery charger, "wind ribbon"
    SIZE: 29.5"(L) x 38.5"(Wing Span)
    WARRANTY: Unknown/not stated

    PRODUCT RATING:

    Because this product is not intended to emit light, the standard "star" rating will not be used.


Cessna R/C Airplane *


Do you manufacture or sell an LED flashlight, task light, utility light, or module of some kind? Want to see it tested by a real person, under real working conditions? Do you then want to see how your light did? If you have a sample available for this type of real-world, real-time testing, please contact me at bdf1111@yahoo.com.

Please visit this web page for contact information.

Unsolicited flashlights, LEDs, and other products appearing in the mail are welcome, and it will automatically be assumed that you sent it in order to have it tested and evaluated for this site.
Be sure to include contact info or your company website's URL so visitors here will know where to purchase your product.


WHITE 5500-6500K InGaN+phosphor 
ULTRAVIOLET 370-390nm GaN 
BLUE 430nm GaN+SiC
BLUE 450 and 473nm InGaN
BLUE Silicon Carbide
TURQUOISE 495-505nm InGaN
GREEN 525nm InGaN 
YELLOW-GREEN 555-575mn GaAsP & related
YELLOW 585-595nm
AMBER 595-605nm
ORANGE 605-620nm
ORANGISH-RED 620-635nm
RED 640-700nm
INFRARED 700-1300nm
True RGB Full Color LED
Spider (Pirrahna) LEDs
SMD LEDs
True violet (400-418nm) LEDs
Agilent Barracuda & Prometheus LEDs
Oddball & Miscellaneous LEDs
Programmable RGB LED modules / fixtures
Where to buy these LEDs 
Links to other LED-related websites
The World's First Virtual LED Museum
Legal horse puckey, etc.
RETURN TO OPENING/MAIN PAGE
LEDSaurus (on-site LED Mini Mart)


This page is a frame from a website.
If you arrived on this page through an outside link,you can get the "full meal deal" by clicking here.